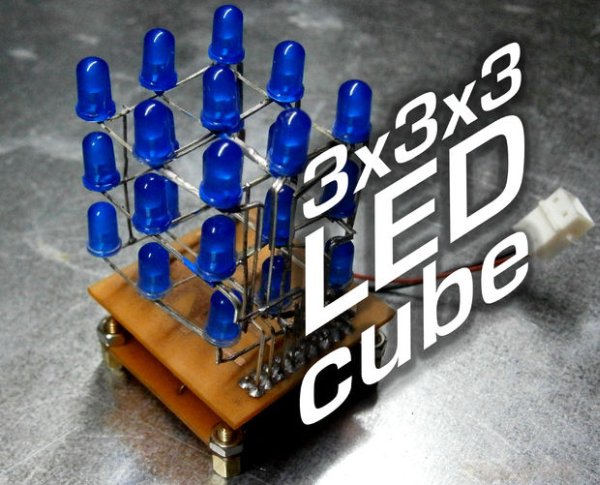
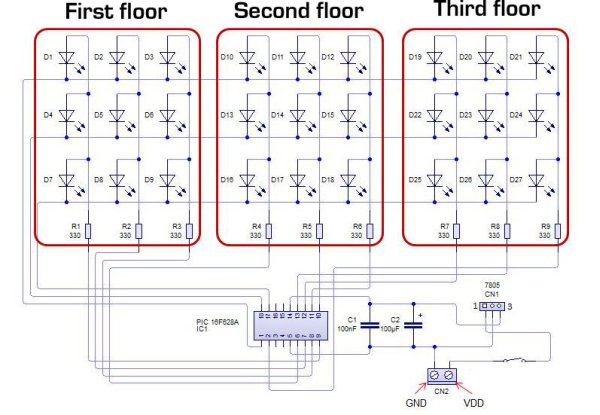
Here´s my 3x3x3 LED cube, it’s controlled by a PIC16F628A microcontroller.
This is my first microcontroller project that finally works, so i suppose is not that difficult to make for beginners.
I hope you’ll enjoy that instructable and even make your own LED cube!
Step 1: Materials
The PIC drives the cube without external IC’s and with very few extra components.
To make your own LED cube you’ll need:
-A PIC16F628A Microchip microcontroller ($2 ebay)
-27 diffused LEDs ($3.50 50pcs ebay)
-7805 voltage regulator ($0.99 3pcs ebay)
-9 330ohm resistors ($1.14 ebay)
-12 male + 12 female headers ($2.59 ebay)
-18 pin DIP IC socket ($0.99 10pcs ebay)
-Controller and cube circuit boards (make them yourself)
-16v 100uF electrolytic capacitor (recycled from old boards)
-100nF ceramic capacitor (recycled from old boards)
-Plug and small heatsink (recycled from old boards)
Step 2: The controller
First, make the controller board (instructions here), drill the holes and tin the pads carefully.
Place all the components as shown in the picture and solder them in place.
Step 3: The cube
Mark a 3×3 1 inch grid in a corck and hole the places for the LEDs, this will keep them aligned while you bend and solder the leads.
Place them diagonally so the leads won’t touch, solder the cathodes to one side and then bend the anodes above the cathodes. Solder the anodes 90º away from the cathodes.
Repeat the process to make two more grids and place them on each other making anodes and cathodes be in the same side.
Bend the 9 protuding cathodes down and solder them in 3 columns.
I’ve bent the 9 anodes so they came arranged in three groups of three, you can simply solder a ribbon cable, but it won’t hold the cube up as a structure.
Use the pictures to guide you.
For more detail: PIC 3x3x3 LED cube
The post PIC 3x3x3 LED cube appeared first on PIC Microcontroller.